A Vision To Clear Solutions.


LAYING INSTRUCTIONS FOR WALL TILES
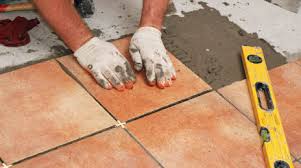
LAYING
INSTRUCTIONS FOR FLOOR TILES


·
Prepare base mortar with cement and sand in the
ratio 1:4.
·
Set the levels for floor (i.e. dead level or slope
as specified by the Architect / Contractor).
·
Prepare cement slurry i.e. mixture of cement and
water to form a thick paste and spread it on the leveled base mortar.
·
Wet the back side of the tile with water. Complete
immersion of water is not required.
·
If tiles are square or rectangular in shape, set
the right angles for the area and place the first tile along the right angle
lines and place it on base mortar. Tap gently only with a rubber or wooden
mallet to obtain perfect levels.
·
Clean the surface of the tile with clean water
immediately after laying with wet sponge, Ensure the base mortar cement which
squeezes through the joints does not settle on the tile. Also ensure that the
water used is not hard to brackish.
·
Do not use the area laid for at least 24 hours.
·
Fill in the joints with pointing material which is
a mixture of white cement and desired color pigment. For higher quality of
finishes, You could use, if required, a polymer based cementitous tilling joint
filler like Roffe rainbow. To get the desired color/shade, mix the same with
water to form a smooth paste which should be applied to the joints, preferably
with the use of rubber squeeze or rubber sheet. Do not apply the pointing
material all over the surface.
·
Allow pointing material to set for 15 minutes and
then clean the surface of the tile with a clean wet sponge, removing the excess
pigment on the tile surface.
·
Wash the surface with soap water or mild detergent
to obtain a clean surface and wipe i.t
LAYING INSTRUCTIONS FOR WALL TILES
·
Plaster the surface to be tiled with mortar (cement
and sand in the ratio 1:3).
·
Prepare cement mortar i.e. mixture of cement sand
and water to form a thick paste and spread it on the back side of the tile
after wetting the tile with sponge.
·
Wet the back side of the tile with water. Complete
immersion of water is not required.
·
If tiles are square or rectangular in shape, set
the right angles for the area and place the first tile along the right angle
lines and place it on base mortar. Tap gently only with a rubber or wooden
mallet to obtain perfect levels.
·
Clean the surface of the tile with clean water
immediately after laying with wet sponge, Ensure the base mortar cement which
squeezes through the joints does not settle on the tile. Also ensure that the
water used is not hard to brackish.
·
Do not use the area laid for at least 24 hours.
·
Fill in the joints with pointing material which is
a mixture of white cement and desired color pigment. For higher quality of
finishes, You could use, if required, a polymer based cementitous tilling joint
filler like Roffe rainbow. To get the desired color/shade, mix the same with
water to form a smooth paste which should be applied to the joints, preferably
with the use of rubber squeeze or rubber sheet. Do not apply the pointing
material all over the surface.
·
Allow pointing material to set for 15 minutes and
then clean the surface of the tile with a clean wet sponge, removing the excess
pigment on the tile surface.
·
Wash the surface with soap water or mild detergent
to obtain a clean surface and wipe it.
DESIRED
SITE CONDITIONS FOR LAYING OF TILES
The following
works are to be completed prior to commencing laying of Ultra Tiles.
·
Final painting of ceiling in rooms.
·
Two coats of wall painting in all rooms (the final
painting should be done only after laying of floor tiles).
·
Wiring and fixing of all electrical components.
·
Plumbing work.
·
Fixing of grills for windows.
·
Fixing and polishing of windows / window frames /
door frames and doors.
·
Bathrooms floor and walls tiles should be laid
after all the work in the bathroom are completed.
·
Fixing of wall and platform slabs.
If
Mosaic/Marble/any other natural stone which needs machining and polishing is
being used in any other part of the floor, it is necessary that this work be
completed before commencing the laying of Tiles.

No comments:
Post a Comment